Let’s face it, essential oils are expensive! I use them every day, and when I make soap – heck, I need to throw in an entire bottle just to achieve that oh-so-heavenly fragrance. Talk about throwing money down the (shower) drain, literally. So I searched for cheaper way (other than fragrance-free soap). After all, essential oils are just herbs and flowers right? Surely I could just crush some of my garden greens? Turns out I was right. Well…kind of. You can make infused oils, and although they might not be as potent as the fancy schmancy distilled essential oils we buy, they do work well in homemade soaps and creams.
The best part? All you need is your chosen herb, flower or fruit, and a carrier oil (preferably one that has a neutral scent eg. sunflower oil, sweet almond oil, canola oil, jojoba oil etc.). You can also use dried flowers or herbs, but the fragrance and nutrients of fresh plants are at their best. There are various ways to extract the goodness out of your garden greens:
- With heat: In other words, over the stove or in a slow-cooker (this will take about a day or two).
- With time: You just let the infusion do it’s thing for two weeks in an airtight jar.
- Distillation: It is possible to do the distillation process at home, which I will cover in another post. The distillation method produces a stronger concentration and is a great way to make your own organic pure essential oils.
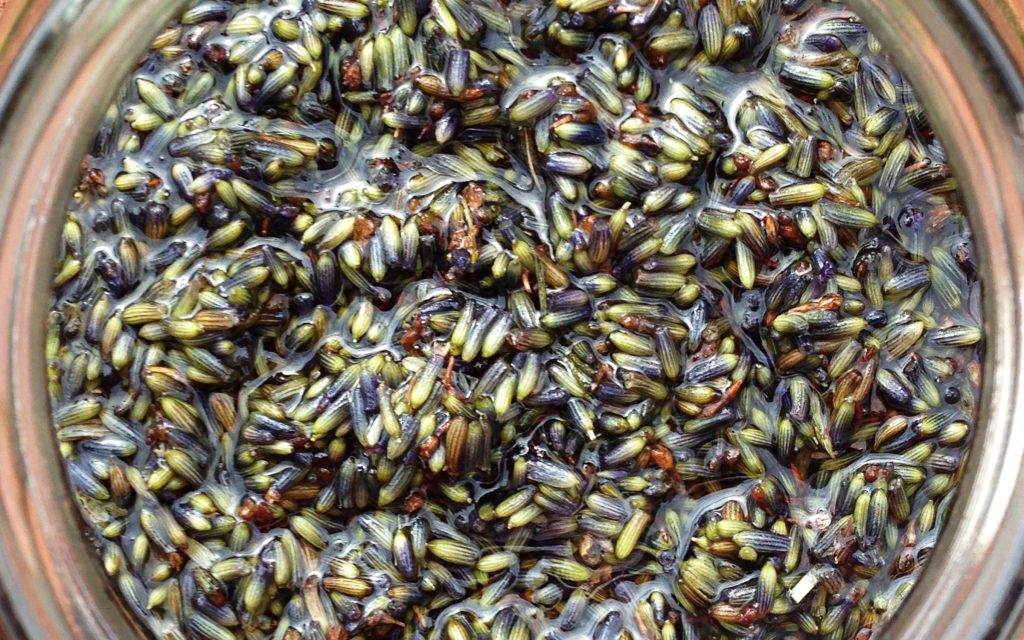
Some oils I like to make include: lemon, grapefruit, orange, lavender, rosemary and basil oil. But first, before we extract the goodness, we need to prepare our greens.
To prepare:
- Wash fruit or herbs thoroughly with water. You can also sanitise them by rinsing them quickly with a high-proof alcohol. Don’t let them soak in alcohol, just a quick rinse.
- Let it air dry. You don’t want any water on them. Water and oil aren’t the best of friends, and water invites bacteria.
- Citrus fruits: Grate the rind of the citrus (try not to get the soft white part i.e. Pith).
Herbs: Chop finely or crush slightly.
Flowers: Pluck the petals.
TIP: The most important thing is to have thoroughly DRIED herbs, petals etc. The presence of any water will allow bacteria to grow, and there’s nothing like mouldy essential oil to put you off natural DIY forever!
To infuse:
Method 1: With Heat
- Place in a slow cooker/pot, cover them with your carrier oil. You want to just cover it with oil, so don’t use too much.
- Turn the slow cooker/ stove on to the lowest heat. Let the oil warm up until it it hot, but not boiling. You don’t want the temperature to rise above 100 degrees Celsius. Keep it at this temperature for as long as possible (if you’re using the stove), or for 5 hours in a slow cooker. If you let it get too hot, you will destroy the nutrients.
- Remove from heat, and let it cool down and stand for the rest of the day.
- The next day, strain the mixture through a sieve/ cheese cloth. Keep the oil, and discard the herbs etc.
- Use this oil on your skin, in your soaps or during bath time as you would use essential oils. Store in glass bottles away from direct sunlight for up to 6 months.
Method 2: With Time
- Pack a glass jar tightly with your chosen plant material.
- Cover herbs with carrier oil. Just use enough oil to cover your herbs etc, as you want a strong concentration.
- Stir well to remove any air bubbles and make sure the plant material is completely saturated with oil. To avoid oxidation and spoilage of fresh plants, leave as little air space possible in the jar and tightly close the lid.
- Place the closed jar by a window that sees a good amount of sunshine for two weeks to infuse. Shake the jar daily.
- Strain the mixture through a sieve/ cheese cloth. With a spoon, compress the herbs etc. to squeeze out any remaining oil the herbs have absorbed. Keep the oil, and discard the herbs etc.
- Use this oil on your skin, in your soaps or during bath time as you would use essential oils. Store in a glass bottle away from direct sunlight for up to 6 months.
TIP: If you want an even stronger infusion. Repeat method two. In other words, after straining the first batch, add another fresh batch of herbs to the oil and let it infuse for another week. I wouldn’t recommend this for the heat method, because further heating may damage the nutrients.
shelf life
The shelf life of your oil infusion is about half the shelf life of the oil you used to make the infusion. The direct heat and added botanicals shorten an oil’s shelf life. For example, coconut oil has a shelf life of about 2 years. So your infusion will have a shelf life of 1 year. Whereas, sunflower oil has a shelf life of about 1 year, so an infusion with sunflower oil will have a shelf life of about 6 months.
CHALLENGE
Concentration: Although effective, infused oils are much less concentrated than good quality essential oils that are made through distillation. I would recommend using homemade oils to fragrance soaps, put in creams and baths etc. But it’s better to buy good quality essential oils for therapeutic/ medicinal uses.
CHERRY ON TOP
Cost: Works out to be far cheaper than buying essential oils, especially if you want to use a lot. For example, rather than throwing a whole bottle of essential oil into a batch of my homemade soap, I rather use this infused oil to fragrance the soap batch. Also, if you have a herb/flower garden, the plant material is absolutely free!
Please let me know how your homemade infusion turns out by leaving a comment below.