You think making soap is complicated, right? Not really. I don’t know why I was so daunted by the idea of making soap. It’s not as difficult as I’d expected. Yes, it involves more effort than my usual recipes, but this basic soap bar recipe just requires some common sense. So if you’ve got time and common sense, you’ve got this.
This post shares how to make a basic fragrance-free soap. You can use this as a base to add your own fragrance and colour as you please. I have purposely chosen affordable oils for this recipe, since it is a formulation for beginners who have never made soap before. That way, if you do mess up, at least it won’t cost you a fortune compared to if you decided to start with extra virgin olive oil, for example! I’ve even included step-by-step photos that’ll guide you to your bubbly bliss.
After a bit of practice, I’m sure you will also be whipping up soap in less than half an hour. If not, then you can enrol in my soap-making course. Before we lather up, let me deal with a few FAQs…
Frequently Asked Questions
Soap Bar Recipe (With Step-By-Step Photos)
This makes about 1.5 litres of soap, which is roughly 15 bars. That’s enough to last one person six months or more!
This recipe has been formulated to be used on your skin. It is bubbly, yet moisturising. Although you can use it for other cleaning purposes, it is best used for skincare. If you are looking for a tough, cleansing bar for dishes and laundry, I recommend using my multipurpose soap bar recipe.
Beginner Soap Bar

Ingredients
For the Soap:
- 374g Water (at room temperature)
- 154g Caustic Soda
- 600g Coconut Oil
- 400g Sunflower Oil
Equipment & Tools:
- A kitchen scale
- A heat-proof glass bowl for the water. Check that the bowl is microwave and dishwasher safe.
- Large stainless steel pot for oils & water (minimum capacity: 2 litres)
- Immersion blender, or electric two-prong whisk
- Stainless steel spoon
- Stainless steel chopping knife
- Soap moulds for 1.5 litres of soap (ice-cream/ margarine containers work really well too)
- White vinegar for cleaning any spills
- A cloth soaked in white vinegar for cleaning
Instructions
- Measure out the quantities exactly with a scale: This recipe is like chemistry. Unfortunately, there’s no compromise and you have to use a scale, and follow all instructions to a tee.
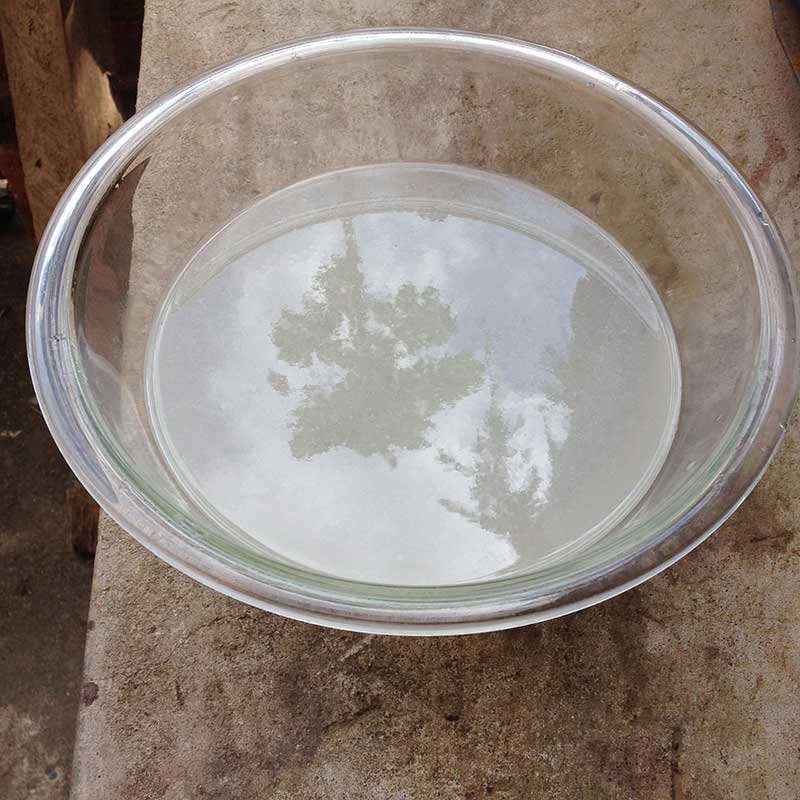
- Make the lye solution: Slowly add caustic soda to water in a glass mixing bowl (NOT the other way around). Do this in a well-ventilated area. Outdoors away from any pets is best . Do not inhale any of the fumes from the reaction. The solution will be murky and it will become hot, this is normal. This solution is known as lye.
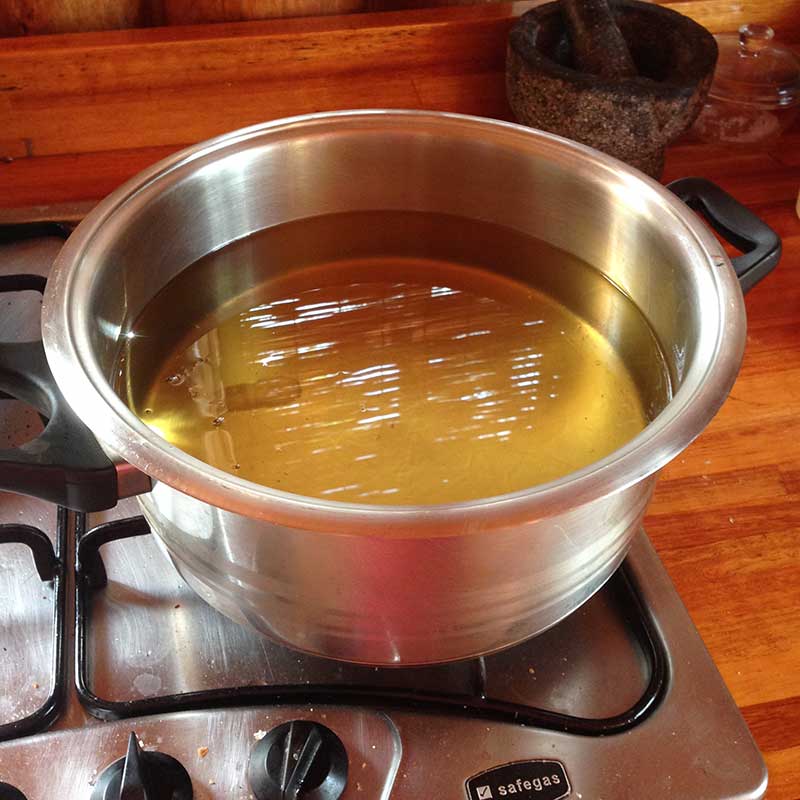
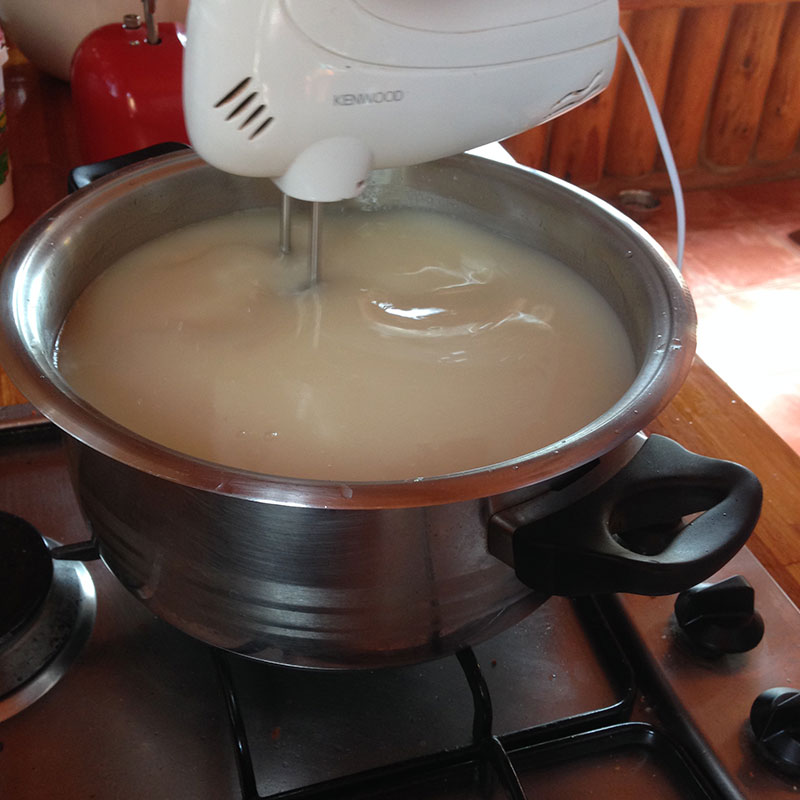
- Start heating the oil: Heat the oil in a genuine stainless steel pot. Do not let it get to boiling point, this is way too hot. If the oil is too hot, your soap will flop and turn into a volcano. If you have a thermometer, the ideal temperature for the oil is 50°C. You should be able to touch the oil and not burn – not that I’m encouraging you to touch hot oil, this is just to give you an idea of what 50°C feels like. The oil is hot, but nowhere near boiling. While the oil is heating up, your lye solution will be cooling down. The lye should start looking more clear (less murky) with time. Make sure that all the caustic soda crystals are dissolved by stirring with a stainless steel spoon.
- Combine lye with the oil: First switch the stove off. Once both the oil and lye solution are roughly the same temperature (approximately 50°C), add the lye mixture to the oil. Do not touch the lye mixture to determine the temperature please – you will suffer a chemical burn. Rather touch the side of the glass bowl, or use a thermometer. Once combined, start blending with an electric mixer or immersion blender. Mixing by hand can take hours! Again, please make sure that the stove is turned off at this point.
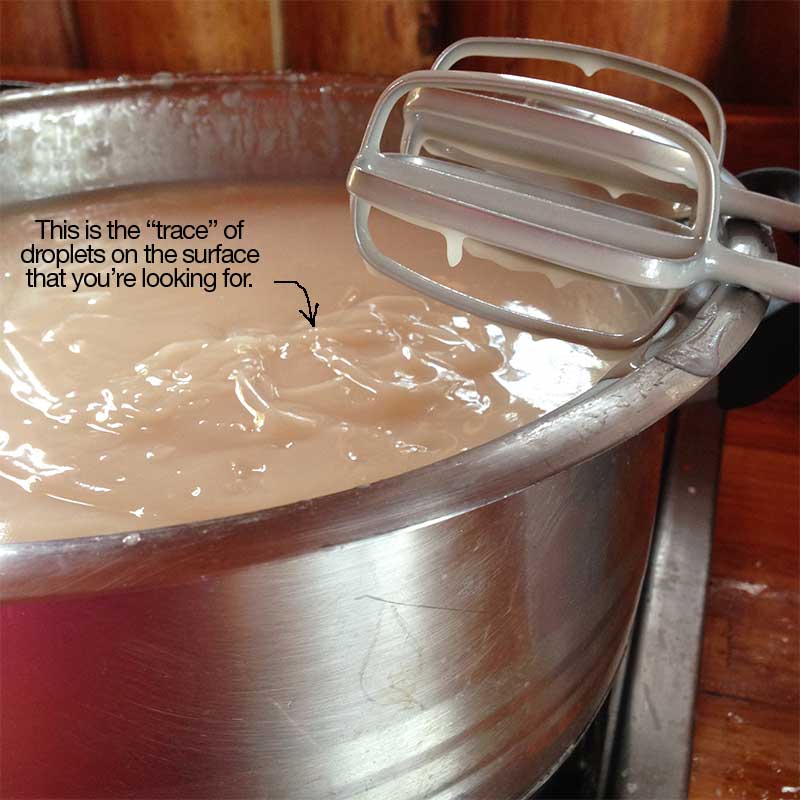
- Blend until you reach “trace”: Trace is basically the state when the soap mixture is ready to be transferred into your moulds. You know you’ve reached trace once the mixture has the texture of instant pudding. When drops of the mixture fall back into the pot and show a visible trace of themselves on the surface, this is trace. The droplets shouldn’t sink back in quickly, or disappear immediately. The time it takes to reach trace depends on your oil and the speed of your electric beater. It takes me about 5-10 minutes to reach trace with this recipe when using an immersion blender, and 10-15 minutes using a two-prong electric beater (the one in the image below). If my description has just confused you more, I do hope the picture helps!
- Add your additives (optional): If you’d like to add essential oils, fragrance oils, spices, herbs, clays, iron oxides or a few drops of liquid colouring – Now is the time. Don’t add too much, as you can upset the soap formula and end up with oily or crumbly soap. I’d recommend about 5-10ml of essential oils, 5ml of fragrance oils, and up to 2 tablespoons of herbs, powders or other oils and butters.
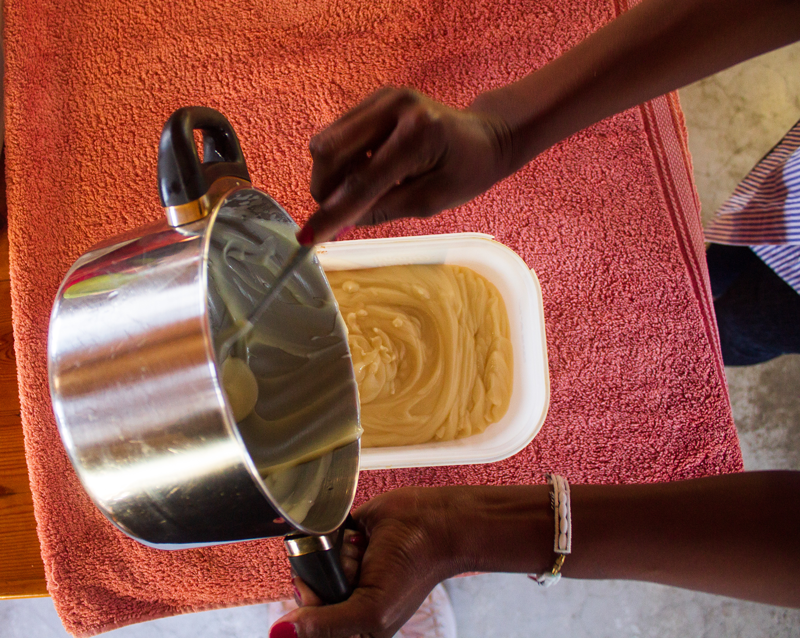
- Transfer the soap mixture into your mould: I like to use empty ice-cream and margarine containers, because the plastic is thick enough not to melt, yet flexible enough to get the soap out easily once it hardens. Some people use proper wooden soap molds lined with freezer paper, or even silicone baking molds. Do not use tin foil to line your moulds, and do not use your metal baking tins or Tupperware as moulds – you will destroy both the soap and the tins/ Tupperware.
- Insulate your mould with a towel or blanket, and store in a warm and dark place overnight: I put the lids on my ice-cream/ margarine tubs, wrap the containers in towels for insulation and store in a cupboard overnight.
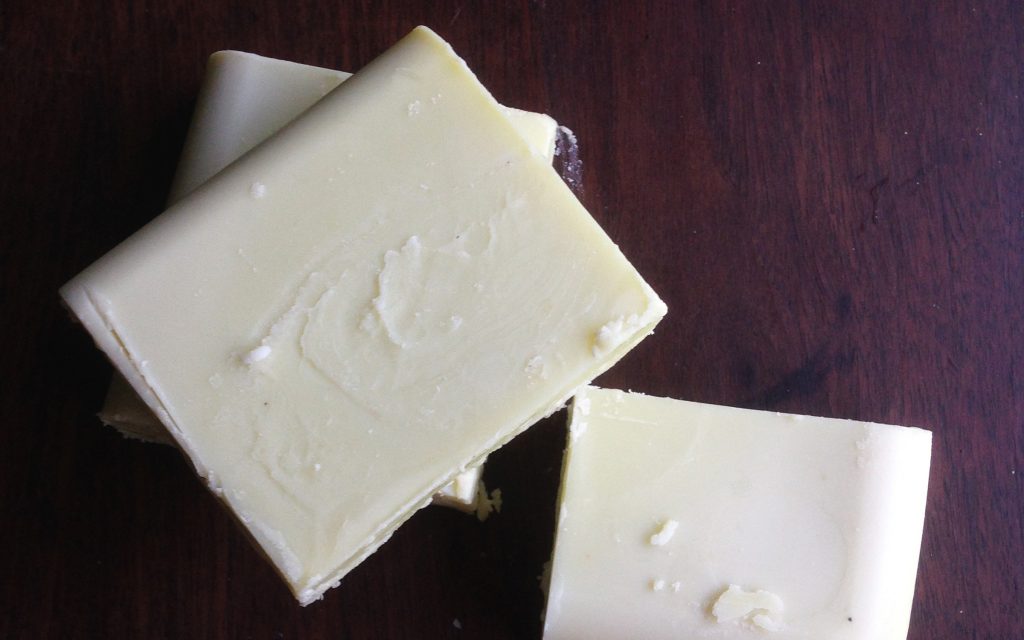
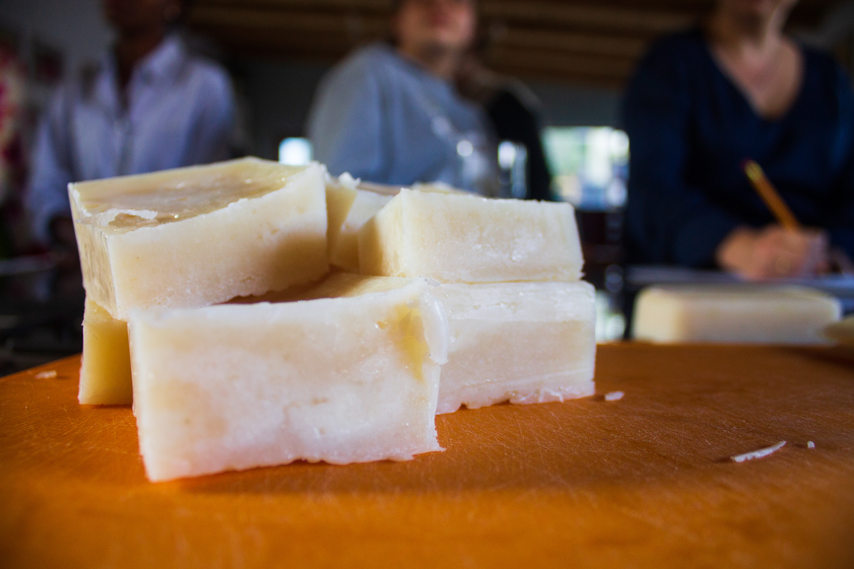
- Cut soap into bars after 24-48 hours: The soap is firm enough to remove from the mould, yet soft enough to be cut into bars. If you wait longer than 48 hours, it may be difficult to cut your soap, and it will crumble. Cut your soap with a stainless steel knife. It will be like the texture of a hard cheese. Do not use your soap at this point, it still needs to cure. If you use it, your skin might suffer from a chemical burn. The lye is still reacting with the oil, only once this process is complete (curing), then you can use your soap.
- Let your soap cure: Like good wine, good soap needs time to cure. The saponification process is still taking place, and your soap is still not safe to use. Place your bars in a well-ventilated area, away from direct sunlight and allow them to cure for a minimum of 1 week until it is safe to use, and 3-6 months for best results. I let my soap cure on an open shelf that doesn’t get direct sun. The longer the cure, the better (but not more than 10 months). Remember to turn them occasionally (every week is good), so that each side gets exposure to the air.
- Lather up! You can use this soap as a body wash or shampoo bar. If you want to make a soap bar that is perfect for washing dishes and laundry, here is my multipurpose soap bar recipe.
Notes
- Plastics that are safe for soap-making: HDPE and PP (look for these codes on the label/ packaging).
- You cannot substitute the oils in this recipe. If you do, you’ll have to run it through a lye calculator again to make sure you have enough caustic soda for the oils you want to use.
- You may multiply the quantities in this recipe to make a larger batch.
- Consider enroling in my soap-making course to learn how to use soap calculators to formulate your own, unique soap recipes using the oils that you want.
Cost & Shelf Life
Cost price: R3.76 per 100g soap bar, or R56,50 for the entire 1.5kg batch (in 2019, based on the best retail prices I’ve found).
Lasted me about: 2 weeks using every day (one bar).
Shelf life: 2 years if stored away from direct sunlight.
Challenge
Long curing time: One week is not necessarily a long time, but when you’ve just made your first batch of soap, you will obviously be eager to try it out, so one week may seem like forever. This recipe uses the room temperature/ cold process (CP) method, but if you’d like to cut the curing time substantially, then you may want to consider the hot process (HP) method. You can use HP soap immediately, whereas you must wait at least one week before you can use CP soap. However, the HP method requires you to be much more precise with temperatures, you need a crock pot/ slow cooker and the method is much longer (2 hours to the mould step). Whereas, the cold process method is very quick (less than 30 minutes to the mould step), but the curing stage is longer.
Cherry on Top
- Customizable: You can completely customize this soap recipe. You can use any essential oils or fragrance oils, colouring and textures.
- Save money: You can make natural soap in bulk, and save the cost of purchasing it all the time. Natural soap is expensive to buy.
- Friendly soap: This soap is super friendly. It’s eco-friendly, grey-water friendly, septic tank friendly, aquatic life friendly. It only contains what you need in a soap bar.
Ingredient Information
- Caustic soda: is also known as sodium hydroxide (NaOH), which most people know as drain cleaner. It is a highly alkaline substance (pH 14) used to dissolve fats in drains, and saponify oils into soap. Although it is a hazardous chemical, in the soap-making process it is necessary to convert all oil into soap. When measured accurately, there will be zero caustic soda in your final soap bar. The final products of the chemical reaction are sodium salt, glycerine and soap. This is why it is safe in natural soap, but it should be used with caution. i.e. Water + Caustic Soda + Oil —> Salt + Soap + Glycerine. (buy here)
- Coconut oil: is used to create a hard, cleansing bar of soap with good lather. Since all the oil turns to soap in the chemical reaction, I recommend using the cheapest and most refined coconut oil. Remember, it also washes down the drain anyway. (buy here)
- Sunflower oil: is used to create a moisturising and gentle bar of soap. (buy here)
Let me know how your soap making journey goes in the comments below. I’d also love to know what additives you’ve chosen to use, so please share. Photos are welcome too 🙂
I love your blog! I have wanted to make my own soap for so long … I will get round to it one day!
Thank you Colleen. It’s always lovely to hear. I hope you do get round to making your own soap one day. You won’t regret it, it’s so versatile!
I’m so excited to make my own soap. Your recipe really sounds easy enough😁 Just want to make sure what is the shortest time to wait to use your soap?
Thank you Natasha
The shortest curing time with my recipe is one week – 7 full days. I’m glad you think my recipe sounds easy-to-follow. Let me know how your first attempt turns out 🙂
I love your blog, my mother is busy with a project of making bar soap. she previously had an agent who supplied her with a long white bar soap and she would in turn grate the soap and melt it to add her own oil essentials. Now she have a challenge getting the supplier. Your blog will be so helpful to get her make her own soap from the scratch
Hi Yvonne. Thank you so much for your comment. It’s wonderful to hear that my blog will help your mom make her own soap from scratch. It’s far better (and cheaper) that way. No need for suppliers. After making my first batch of soap – I’ll never go back to buying it! I hope it goes well for your mother.
Hie, thank you so much for your recipe i can understand it and it shows its easy to follow.but I’m struggling to find lye in shops. Every time I ask about caustic soda,they are showing me the one we use on drain unblockaging.
Hi Grace,
I’m glad that you find my recipe easy to understand. And yes, the caustic soda that you use for drain unblocking is the same as you use to make soap. I know it sounds crazy, but soap-making is a chemical reaction. So if you measure everything correctly, there will be no drain cleaner in your soap! All the ingredients transform to make natural and perfectly safe soap. Just make sure there is nothing else added into the drain cleaner – it must just include caustic soda, and nothing else. No aluminium etc. If this makes you weary, rather buy caustic soda online from a soap-making store like Fun with Soap. Please also read my FAQs at the beginning of this recipe to understand more about why caustic soda is safe in natural soap, and the safety precautions you must take when using it.
Hi. I ran the figures through the MMS Lye Calculator and it recommends a minimum of 250 ml of water but you used 175 ml. I assume that this will make for a shorter drying time (curing time should stay the same) and a harder bar in the long run. How did the soap turn out?
Hi Nirvana. Thanks for your comment. You are right, the drying time is shorter. I like to just use enough water for the lye, so the MMS Lye Calculator was suggesting a 1.7:1 water to lye ratio, whereas I usually use a 1.2:1 water to lye ratio. The soap is perfect – I’ve had good feedback from people I’ve asked to try it. It is a relatively hard, cleansing bar (not as hard as a pure coconut oil soap). It’s not very conditioning, but it doesn’t dry your skin out. Have a look at the below table for more info on the quality of this bar.
Hi there
Love your blog. I have been making my own soap for almost a year know. Nothing better than good natural soap. I cannot use the commercial soap anymore.
Thank you.
Rasheeda
Hi Rasheeda
Thank you for your positive comment. I really appreciate it. I’ve also been making my own soap for about two years now, and I completely agree with you. I’ll never go back to buying. It’s so much better. I hope you find other recipes on my blog that you will enjoy.
Kind regards,
Christina
I love your detailed and thoroughly outlined recipe. Keep up the good work
Thank you for your positive feedback. I appreciate your support =)
Hi, I know this isn’t related to this recipe but I would like to make liquid soap. My question is where can I buy the (KOH flakes) potassium hydroxide flakes from in SA specifically in JHB. Thank you for sharing your knowledge.
Hi Kayshree
Thank you for your question. You can buy KOH from an online store called “Fun with soap“. They offer courier delivery and are also based in Kempton Park. I haven’t yet attempted liquid soap (it’s on my to-do-list) and neither have I bought from this store, so I can’t tell you anything about their service etc., but it’s worth a try. Wishing you all the best for your liquid soap.
Such a great intro to soap making – thank you:)
About the containers you pour your soap mixture into – are they lined with anything?
I made my first batch a few days ago and the soap ended up stuck in the plastic container – had to damage the container to get the soap out.
Hi Lil. Thank you for your feedback – It’s great to hear that you’ve tried the recipe. I’m sorry about your containers though. To answer your question, nope I don’t line them with anything and they come out with no problems. Are you using ice-cream or margarine plastic tubs? That plastic is really flexible and you shouldn’t have to damage the container to get the soap out. Other harder plastic containers may not be flexible enough (like Tupperware etc.). You could also try lining the plastic tubs with a bit of oil, like you do for baking, so that it slips right out. Wax paper hasn’t worked for me (the paper gets stuck to the soap and then I have to try and peel it off). Let me know if that helps?
Baking paper works a treat to line any plastic container!
Thank you for the tip Anni 🙂
Please assist where do you buy your lye…My Dr recommended that i only use dove soap so if i want to make my own soap which ingredients can i use for my soap?
Hi Yaya. Gosh, if your doctor recommended that you can only use dove soap, then your skin will LOVE you if you start using natural soaps without the additives that are included even in Dove. You can use any natural oil for your homemade soap. For you, I would recommend this exact recipe which uses a combination of coconut oil and olive oil. Don’t add anything else (i.e. fragrances, colourants etc.). Just follow my recipe to the tee. I buy my lye from any hardware – just ask for caustic soda. I hope that helps. Let me know how it goes – and how your skin reacts. If it doesn’t react with Dove, then it surely won’t react with this basic soap recipe. If anything, your skin will feel better. Good luck!
So stunning to read your post. Have been seeing such beautiful soaps online and dying to try it out and this just seems so doable! And love the little receipt which makes things very attainable. Wish I could go to a soap making course! Know of any? Thanks for your knowledge. PS I’m based in joburg re: course.
Hello Nicole. Thank you for your positive comment. Have you attempted to make your own soap yet? I’d love to know how it goes, and if you find my recipe as “do-able” as it seemed when you first read it. I hope so! I’m sorry that I do not know of any soap-making courses based in JHB. I taught myself from reading many other blogs and watching YouTube videos. But you are not the first person to ask me about courses. I’m toying with the idea of holding my own workshop in JHB early next year – If I do, would you like me to let you know about it? Wishing you all the best.
Hi Christina
I would be really interested in Soap making course i JHB!! Please keep me in the loop! Thanks so much!
Hi Chrystal,
Thank you for expressing your interest. You are not the first person to request this 😛 I will be looking into this for the new year, and if enough people are seriously interested I will host a workshop. So I will keep you in the loop.
Regards,
Christina
Hi, Christina, this is a great guide for newbies who want to get into soap making. Everyone should make at least one batch of soap in their lives!
One tip: adding vinegar to lye can worsen chemical burns, as their neutralisation reaction is strongly exothermic. It’s a better idea to work near a faucet or other large volume source of water and thoroughly rinse off any lye that gets on the skin, after which the area can be wiped with vinegar.
Hi Chikondi. Thank you for your positive comment, I appreciate the feedback and the helpful tip. I will update my blog with your insight, and I’m sure my readers will appreciate your advice too. I did not realise that the neutralisation reaction was exothermic. Thank you again. I also see that you are an expert soap-maker of Rondavel Soaps. I may just buy one of your products and write a review…your soaps look divine and sustainable, which is just my kinda thing 😉
Hi, what brand of olive oil should i buy and where is the oil at food lovers or dischem ok
Hi Hannelie. You can use any brand of olive oil. So, yes, the oil sold at Dischem and Food Lovers Market is good for soap. However, if this is your first attempt at making soap, I strongly suggest that you buy a cheap brand to begin with – at least until you are confident in soap-making. It can be an expensive mistake if you buy an expensive oil and don’t get it right the first time. Obviously, higher grade oils like those that are organic, cold-pressed or extra-virgin are better quality oils, if you can afford them. But cheaper oils will work. If you are looking for the best quality olive oil, I recommend Crede (certified organic) or Prince Albert (Cold-pressed extra virgin). I hope that helps.
Hi Christina.
I would be interested to see the difference between the recipes for the hot and cold methods. Could you send me the (precise) recipe for the hot method. I am keen to try them both out to make some organic cleaning products.
Kind regards
Brenda
Hi Brenda. Thank you for your comment. Making your own cleaning products is a superb idea! I hope that you do! I personally haven’t tried the hot process method yet, so I don’t have a personal recipe to share, but here is a recipe from another blog which I hope helps you. Have fun 🙂
I love your blog! Thanks!
Hi, love your blog. It will be my first attempt to soapmaking. I’m interested in the hot process method. Do not want to wait so long for curing. Could you give me more info on this method. Thank you very much.
Sonia
Hi Sonia. Thank you for your comment. I personally haven’t tried the hot process method yet, but here is another blog recipe which may help you with the information you need. Good luck and enjoy your first soap making adventure 🙂
Keen to try this. You mentioned starting with cheaper oils if it’s your first time – which oils would work well? Thanks
Hi Heather. Thank you for your comment. I would strongly suggest starting with a cheap brand of coconut oil i.e. one that is not cold-pressed, extra-virgin or organic. Dischem sells one-litre batches of coconut oil for around R56, which is the best price I’ve found. Coconut oil is also great for a first attempt, because it will definitely produce a hard bar of soap. Unlike liquid oils like sunflower or canola, which will produce very soft and mushy bars if you don’t mix it with a more solid oil. So coconut oil is perfect for beginners. Let me know how your first attempt goes – good luck 🙂
I started making hot processed soaps about 2 months ago and love using cold processed recipes in them. The first one I made was the coconut oil one which was the easiest one then I did the charcoal and tea tree blend with the coconut oil one as an end additive. I am now trying your one out and hoping I have just as much success. If I want to add lavender flowers when would be the best time as I don’t want them turning brown? What would be the lye mix for a kilo coconut oil? Weighing out 933g every time is very time consuming and would be easier with a kilo at a time
Hi Kat,
Thank you for your comment. It’s great to hear that you are enjoying your soap making journey. Charcoal and tea tree – what a splendid idea! I should give that a try. To answer your questions, you would add the lavender flowers right at the end when your hot or cold process step is finished, and just before you add the soap to your moulds. The lye mix for 1kg of coconut oil is 172g of NaOH and 207g water. I use SoapCalc to calculate these – you should try it too. It’s quick and easy to calculate an entire recipe. Good luck with your recipe, and do let me know if my recipe is a success for you. I always appreciate feedback 🙂
Best regards,
Christina
hi,this is my first leap into the unknown and I intend to start a business soon depending on how I fare out with my experiments and I ‘ll keep you posted. thanks for your help…mohamed.
Hi Mohamed,
Thank you for your positive comment. It’s great to hear that you want to start a business – the more natural products out there the better. I hope that my blog will help you with your journey and with all your experiments. Try to have fun with it at the same time! I wish you all the best for your new business venture. Feel free to keep me posted on your success 🙂
Kind regards,
Christina
This soap is top notch. Really no need to ever use anything else again. Honestly.
Hi William, thank you for your incredibly positive feedback 🙂 I really appreciate it. It is encouraging to hear that it works as well for you, as it does for me.
I am so glad and excited that I have found your blog. I am interested in learning how to make soap and your guide has helped me so incredibly much. I am also from South Africa so all the tips and tricks and links that you share are so ideal for fellow South Africans. Thank you so much for sharing. I wish you everything of the best in your blog and career! With lots of thanks, from Cape Town.
Thank you so much Morgain. I really appreciate your positive and encouraging feedback. I wish you all the best for your soap-making. Feel free to let me know how it goes, or to ask questions =)
Hi,I’m so glad I found your blog,been yearning to learn how to make soap. If you decide to have a workshop in Cape town, I’m definitely there!! I just wanted to make sure, if I want to add colour to the soap,do I just need normal food colouring?
Thank you so much!!
Kenoline.
Hi Kenoline. Thank you for your comment. I was just in Cape Town a month ago 😛 It’s good to know that there is an interest there, and I will certainly let you know if I have a workshop planned. To answer your question, yes, you can use normal food colouring, but it’s not very natural. If you’re looking to make a completely natural soap, you’d need to source natural food colouring. You can also use natural ingredients like clays, iron oxides or spices. For example, african green clay, turmeric, paprika, spirulina etc. I hope that answers your question. Good luck! Let me know how it goes.
Hello I make my own natural tissue oil that is good for skin it even heal pains on joints i made it with plants oil and my clients are asking me to make bath soap. And your blog will help to make my own bath soap .Thank you godbless you i will be back soon.
Hi Thabang. Thank you for your comment. It’s great to hear that you are making your own natural tissue oil for yourself and for others! And now a soap too! I’m glad my blog could help you. Let me know if you have any questions, and let me know how your soap turns out. Wishing you all the best. 🙂
Hi chiritine ,
Do you know where I can get the glycerin?
As well , what is the temperature recommend in order to keep the qualities of the olive oil?
Do you know to make shampo?
Shower gel soap with a moisturizer ?
Thank you so much
Hanna?
Hi Hanna
You can get glycerin from Dischem for about R32 for 200ml, or you can get vegetable glycerine online from Fun with Soap for R30 for 500g. If you go ahead with an order with Fun with Soap, please do me a favor and tell them you heard about them through me. I’d really appreciate it 🙂
Also I would recommend keeping the heat as low as possible for olive oil to retain its nutrients. You would want to stay well below its smoking point, which is about 190’Celsius . But I would want to stay below 100’C.
You can find a beginner shampoo recipe here, or my melt & pour liquid soap recipe here. I have recently made liquid soap from scratch – which makes the perfect shampoo, hand wash, body wash, dishwashing liquid etc. That will be the next recipe I post.
I hope that helps.
Regards
Christina
Wow just came accross this now. I need to make clear bars – not milky white. What would you recomend?
Hi Candice,
Thank you for your comment. I’m glad you found my soap bar recipe. Making a translucent bar of soap requires a solvent like a very high proof alcohol (like rubbing alcohol). The process is similar, except that you would need to follow the hot-process method and then when you have a cooked soap mixture, you would add your solvent. I will post about this in future, but in the meantime, I recommend reading this recipe from another blog for clear bars.
Good luck!
Kind regards
Christina
I am so excited to try this out. Is the Powafix Caustic Soda fine for soap making? I want to make the hot method but am a bit nervous. Thanks for your lovely blog.
Hi Kate
Thank you for your positive comment. Yes, Powafix caustic soda is fine for soap-making. I would suggest trying the cold-process method first. It’s easier. Don’t be nervous. You’ll be fine. I can summarise the entire process in under one sentence, that’s how easy it is: dissolve caustic soda in water, heat oil, combine water and oil, blend, pour in mould. See, that’s easy. The most important thing is to just be aware of the safety precautions, otherwise making soap is SO simple. You can do it. Let me know how yours turns out, okay? 🙂
Thanks for your reply. I tried to hot method because I wanted tp use my soap as soon as possible. I must have over cooked it because I ended up with a white powder. I then added little bits of warm water and coconut oil to the powder and was able to form soap bars. These have hardened quite nicely and make a really nice soap. It is slightly drying on the skin but perhaps that is more due to Winter.
Hi Kate,
I’m glad to hear that you made soap. Well done for taking that first step. Yes, I think you may have either overcooked it (too long, or too hot), or perhaps used too little water. But I am glad that it all worked out in the end. Did you follow the quantities and oils in my recipe, or did you use your own amounts and oils? I’m trying to figure out why it may be drying on your skin.
Regards,
Christina
Hi Thanks so much for this fun and interesting topic on soap making. Have been reading a lot of blogs and I get confused along the way. But thanks to you I guess this is going to be fun than I thought. I want to make soap using Shea butter, coconut oil and olive oil. I am confused as to use melt and pour or lye. Please I need some assistance. Kindly help me out. Thank you
Hi Harriet
Thank you for your positive comment and your good question. If you intend to make soap bars from scratch, then you need to use lye. In other words, follow the recipe on my blog. Melt and pour is a method in which you do NOT make soap from scratch. Instead, you take an already made soap bar, and then you re-melt it in order to add your preferred additives and to achieve a shape you want. Perhaps an analogy is the best way to understand it. Melt-and-pour soap is like melting an existing candle, and then colouring the melted mixture and adding a dash of your own scent, then letting it re-harden. Whereas making soap with lye, is like gathering and preparing the raw materials in the beginning (like beeswax, colourants, fragrance etc.) to make a candle from scratch (as opposed to melting an existing one). I’m not sure if that explanation helps you make sense of the difference. The bottom line is that in order to make soap from those oils you mentioned, you need to use lye, and follow my recipe.
Kind regards
Christina
Hi,
My name is Phuti, and would really love to start making my own soaps. I loved this article and thought that It was soo easy to read. Now I just need to go and make the damn soaps, lol. Thanks a ton.
The way I struggled to find Lye in South Africa, as soon as put caustic soda, then everyone sells it. Thanks alot, God Bless
Regards
Hi Phuti,
Thank you for you positive feedback. I’m glad to hear that you found the recipe easy to follow. That is what I hoped to achieve, because so many people are intimidated by the idea. I’m also relieved that you finally found where you can buy caustic soda / lye. Good luck with your first soap batch, and let me know how it goes.
Kind regards,
Christina
Hi very interesting blog. I am allergic to Olive Oil, can you recommend a replacement for it? Thanks
Hi Avril,
Thank you for your feedback. To answer your question – you can use any other oil that is liquid at room temperature. Eg. Sunflower oil, grapeseed oil, canola oil etc. You can even make a 100% coconut oil soap. It will be a hard bar of soap that is super bubbly. If you choose to use only coconut oil though, then I recommend using more water so that it does not dry your skin. I would change the recipe to the following for a 100% coconut oil soap:
1000g Coconut oil
415g Water
172g Caustic Soda
Happy soaping. Let me know how it goes!
Best regards
Christina
Hi Christina. I’m so grateful to have found a local lady who knows her soaps! Thanks to your oh so easy to follow soap bar recipe, I made my 1st batch of soap bars which I poured into all sorts of cute silicone moulds… They turned out so well and I was blown away at how well it worked on my skin. Gave a few away and everyone came back with such positive feedback. We all loved how moistening it was and how well it lathers… Thank you so much for the free info. x Michelle
Hi Michelle,
What fantastic feedback! Thank you so much for your encouraging message. You have made my day. I am so delighted to hear that you and others have enjoyed my recipe. Yay! I’m happy that you found the recipe easy-to-follow too. It’s my absolute pleasure – this is what keeps me going. Thank you for taking the time to give me such detailed and positive feedback. I sincerely appreciate it. Happy soaping!
Many thanks,
Christina
Hi, Christine, I love the updated beginner’s guide to soap making. It’s also great to see so many people interested in the Cold-Process method and the variety of additives they want to try. We who are doing it as a business tend to get stuck in the trap of having to repeat the same recipes over and over since customers always want their familiar favourites to be available. If you’re looking for more inspiration or exciting additives to experiment with, you should check out Auntie Clara’s Handcrafted Cosmetics blog. She does some very creative soap making with ingredients like Puff Adder fat(!) and snail slime, and some more technical experiments that have been helpful in correcting problems we’ve experienced with big batch soap making.
Thank you for your feedback on my updated beginner’s soap guide. Puff adder fat and snail slime! Oh my goodness – that is incredibly bizarre and interesting. Thank you for sharing that. And I hope your soap business is doing well 🙂
Hey
You don’t know hoooooow much I love you right now ??, your recipe is so easy and understandable and i’m So glad I bumped into your blog now I can’t wait to make my own soap , imagine i looked for lye everywhere and I couldn’t find it so now I just found out that lye = caustic soda ? (someone in the comments said “now everyone is selling caustic soda” I feel her ). Now I know where to find lye/ caustic soda ?.
I love the fact that you gave us links for those items that are difficult to find . I am happy ? and grateful for this blog . I’m going to make my first batch soon and i’ll Let you know how it went .
Thank you ?
Hi Maggie,
Thank you for your positive feedback about my blog, and particularly about my soap bar recipe. I’m so glad that you find my instructions easy to follow. That’s exactly what I am aiming for. And I’m happy that you now know where to find caustic soda / lye . I remember that I felt the same way when I started out – I had no idea what the difference between lye and caustic soda was, and where to find it. I look forward to hearing how your first soap batch comes out 🙂
Regards
Christina
Please notify me of your next date for the lotion and creams workshop
Hi Raazia, thank you for your interest in my workshops. It’s difficult for me to manually keep track of everyone who asks me to notify them. Please could you sign up for my notifications here: https://learn.naturalnerd.co.za/notifications/ . You will receive an email alert as soon as I announce the next cream and lotions workshop in your area. That way, I also won’t forget. No spam. I promise.
Hi. I am making your soapvrecipe tommorow. Will it be fine safe to use after only 2 weeks of curing?
Yes, your soap will be safe to use after curing for 2 weeks 🙂
Thanks so much for the recipe I am very excited to try it out.
Would I be able to use this recipe for designs and swirls? And if I added powder coconut milk or powder cows milk will that effect the lather of the bar and speed up acceleration?
Yes, you can use this recipe for designs and swirls. And yes, if you added milk or milk powder, the lactose will accelerate trace and the soap mixture will get very hot. To avoid this, you need to soap at a much lower temperature (35-40’C) and also store your soap mould in the fridge or freezer overnight.
Hi just made a batch of soap. Has turned out really well overall . Just had an issue getting it out of the ice cream tubs as it was stuck to the bottom. I will line with baking paper next time. Used your basic recipe and added 1 teaspoon of activated charcoal to a small amount of the batter. Then swirled it into the main batter for a marble effect. Thanks for the informative post!
Hello Pam,
Thank you for your feedback. I’m following up – did you ever try the baking paper and did it work? Next time, you may want to let it sit in the mould for an extra day just to dry out more. Then it should pop right out. Sometimes the soap may still be too soft to pop out of the mould flawlessly. When that happens, I just leave it for another 24 hours and try again. It usually works. I find that baking paper sticks to my soap, and I have to peel it off. Freezer paper has worked better for me, but cling wrap works best if you want to use something that will peel right off. I’d love to see a photo of your activated charcoal swirl – feel free to post a photo on my Facebook page, or tag me on Instagram – @naturalnerd1.
Hi Christina,
I happened upon your blog around 3 weeks ago and what a find! Thank you so much for all your info and especially the soapcalc tool! I tried making my first soap ever last week, using my own recipe after playing around with different combinations of oils I had at home as follows:
Coconut oil 45%, Castor oil 10%, Duck fat 10%, Sunflower oil 15%, Olive oil 20%, with a water:lye ratio of 2.5:1. I’ll leave it for another week as it’s still a little soft (only been curing for 6 days) but so far it looks very promising.
Thanks again, I look forward to trying my own dish washing soap next.
Thank you for your positive feedback David. I am happy you found my blog, and that you have already made your own batch of soap. That sounds like a good combination of oils for a hard, bubbly, yet moisturising batch of soap. A balanced selection of oils indeed. Well done! I’d love to hear your feedback on the soap’s qualities when you use your soap for the first time. And good luck with the dishwashing soap – I’m confident that you’ll get it right the first time. Feel free to post photos on my Facebook page or tag me on Instagram @naturalnerd1 so that I can see your soap.Take care, and thanks again for sharing your feedback and recipe 🙂
Hi Christina,
I must confess I was positively surprised by how it turned out. It washes squeaky clean, lathers up wonderfully, and doesn’t dry out your skin. I even wash my hair with the soap. Being used to having to use more soap with store bought bars, it at first caught me by surprise as you need so little of this. My wife also uses it now and I’ve given some to a friend who has real problem skin and pays a fortune for some liquid soap that doesn’t irritate his skin. He was very impressed, saying it’s the only soap bar he’s been able to use on his skin. The only thing I will do differently is add some more essential oils like tea tree. Thanks again!
Wow! Sounds like you’ve come up with an excellent soap recipe. That is amazing feedback from your friend. Now I am eager to try your recipe for myself. But I’ll probably have to substitute the duck fat though. Thank you again for sharing your recipe, and for taking the time to share a follow-up of the results after using it.
Hi Christina,
Thanks for such a wonderful blog. Please share recipe for the green bar soap or how can this recipe be altered for the green bar.
Thank you for your compliment Charles, I’m glad you’re enjoying my blog. Which green bar soap are you referring to? If you are asking about how you can colour soap green, then you can add up to two tablespoons of spirulina powder or moringa powder, depending on how strong you want the green colour to appear. 1/2 teaspoon of spirulina powder will result in a pale green soap, whereas 2 tablespoons will result in a dark green soap. You could also add green kaolin clay for a light green colour. You add the powder after trace (step 6 in the above recipe).
Hi Christina,
I’m so glad Google nudged me on to visit your blog -and “nerd” describes me to a T… 🙂 Your blog is a fabulous resource! I’ve followed the instructions to make my first batch of the “Basic soap for beginners”, and have taken it out of the mould this afternoon – looks like it will be a great, can’t wait for it to cure a bit so I can try it out. I stopped by here as I wanted to say thank you and commend you for investing the time and resources into setting up this blog. Needless to say – I’m a fan now, and will undoubtedly be a regular visitor here for more insights and guidance on more of your products. I’ve grown increasingly uncomfortable about the amount of chemicals we use as a matter of course in our daily lives, and am always noseing around for more natural cleaning stuff.
Thank you!
S
Hello S
Thank you so much for taking the time to thank me, and to write such comprehensive comment. I really appreciate your feedback. I hope that you do visit here often, and that you find many new DIY alternatives to your favourite products. I don’t post as much as I would like to – I have a book full of unpublished recipes, and comments like yours encourage me to keep going. Thank you. I hope you were happy with the results of your first soap batch after a bit of curing. May there be many more soap batches to come. Take care.
Hi, Thank you for a great recipe with pictures to guide as well.
Just made my first batch….super excited to try it when its ready.
I did however notice that my lye solution was cooler than my oil. It was about 40°c and my oils were 50°c. I mixed them together for a long while before trace. Covered up as suggested after molding. I did notice the soap pulling up in the center, much like a cakd does. Will the fact that I mixed the 2 solutions together at differing temperatures resukt in this and will it affect the outcome? If so, can I rebatch the soap, and how would I do this?
Hello Carla. Thank you for your feedback – I’m glad to hear that the recipe was easy to follow.
The difference in temperature that you described should not cause your soap to flop, so a rebatch shouldn’t be necessary. You can technically make soap with cold lye solution and warm oil – this will just affect the amount of time it takes to get to trace. You will blend a lot longer if you use cold lye. But the soap won’t flop. There just needs to be enough heat for the reaction, which is why cold lye and cold oil won’t work. The reason for combining at the same temperature, or at least to try to, is for a stable reaction. Things combine better when they’re the same temperature. Just like cake – recipes often say that eggs and milk must be room temperature. This is also the reason you don’t want to boil your oil, because there will be too much heat in the reaction and the soap will volcano.
I know exactly what you mean by it pulling up. That happens to a lot of soap when it is going through the gel phase. Remember, the chemical reaction is still taking place. It will often rise and sometimes crack a little. But this shouldn’t happen too much. If it’s extreme, the mixture may be too hot. Just like a cake, it usually sinks down again after expanding up during the gel phase. Did you notice this afterwards – that it returned to normal? The important thing is to keep this soap recipe insulated and warm during the gel phase. This doesn’t apply to all soap, other recipes that use sugars must be refrigerated / frozen instead of insulated.
To rebatch soap, you basically cut it all up into small chunks, put it in a pot or slow cooker on low heat and start melting it. You usually add a bit of water to help it melt. For this recipe, I’d start with adding a cup of water. Most of it evaporates during the melting process. When you get a smooth, thick paste then you can scoop it out and press it down into a mould. It won’t look as pretty, but it will work as soap.
I hope that helps you.
Good day Christina
Thank-you for the recipe for beginners.
It’s something l’m going to tackle as l’m usually more a melt & pour soaper.
The question(s) l’d like answered are.
1) which is the best lye brand to get. Is the one in the cleaning isle the right one.
2) We do a lot of camping & l would like to make either a 2-1 soap or 3-1 soap for next year. Have you got any ideas for me
Stay safe during the silly season.
Ps the multi soap one is definitely on the camping cards to make.
Hello Des. Sorry for the delayed response to your comment – I’ve been inactive here for a while. Just getting back. To answer your questions: (1) If buying from the grocery store or hardware, I usually buy Powafix Caustic Soda. The important thing to remember is to make sure there is nothing else except sodium hydroxide (a.k.a Caustic soda) in the ingredients. Be careful of some products that contain aluminium or other ingredients, as those are dangerous in soap. Always read the ingredient list and labels thoroughly. If you are doubtful, rather buy lye online from a soap-making store like Fun With Soap, or Soap Barn. (2) My Multipurpose soap bar is the perfect 2-in-1 or 3-in-1 soap. It is effective and safe for bathing (skin & hair), laundry, and dishes. I know that sounds unbelievable, but it’s true. It will not strip or irritate your skin. It’s the perfect balance between cleansing and mild. In terms of skin & hair use, I recommend conditioning and moisturising afterwards. Simply because the soap has zero conditioning qualities. It’s a safe soap, but not a luxury beauty soap. I hope the soap serves you well on your camping adventures 🙂